Tuesday, January 31, 2012

More than Before and After

Who doesn't love a good Before and After! I know I get ridiculously excited about them. It is a lovely brief snapshot of transformation. Trash to Treasure, Blah to Beautiful... all in the blink of an eye, or the click of a mouse!

As I mentioned here we have been working on our kitchen the past few weeks. It is so close to being finished. I am waiting for some things to cure and then I can put it all back together! I am so excited! But this post is just a reminder to all of us that a project always consists of so much more than the Before and After! It is so easy for me to lose sight of that as I surf blogs or Pinterest. I see these gorgeous makeovers that appeared to happen with a simple wave of a wand. Oh, of course logically I know it didn't happen like that, but it seems so easy!

Well, in order to get to every beautiful rewarding After, you have to push through the During stage. The one we gloss over in our heads when we picture the potential of a room/piece of furniture/DIY whatever. I just thought I would pop in today and keep it real with some snap shots of the During for your viewing pleasure! But first... lets check out a quick Before shot. All in all, not a bad kitchen, just not one I was in love with.


So I started the deconstruction. Not too much had to be done yet as we painted the existing cabinets. But I did have to pull off every door and many of the drawers and haul them all down to the dungeon basement.


Oh yeah folks! My boys and I spent a good two to three days down here painting all of those doors. Luckily they have a little play area down here to keep them occupied.


Meanwhile... this is what my kitchen looked like! This is not a fun stage to live in! When I finally got all of the cabinets painted and hung back up I started with the countertops. Actually the island countertops were already finished in the above picture. I am so glad I did them separate from the rest.... You will see why in a second.

While working on the rest of the counters we have a TON of stuff piled up on that island. I don't even know where it would all go if that was curing too! Notice I found a place where I could still have my coffee maker plugged in! Mama NEEDS her coffee people! 

Oh! And my lovely new dining room I just finished??? Yeah piled high with more junk from the kitchen!


Why yes of course that is a kitchen sink laying in the floor! And yes that is a dish drainer on my pretty new sideboard!

Is all the work and chaos worth it? I think so. But I would do well to think more on the During before I go into my decorating frenzies! Anyone else struggle with this? Please say its not just me!

Hopefully, by this time next week we will have some order back in our lives again..... at least until the next project!

Thursday, January 26, 2012

Anthropologie plate

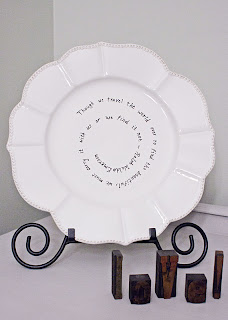
I have had my eye on this cute plate from Anthropologie for a while now. It is very simple, but a little whimsical. The only problems were, 1 that it is $28.00... for a plate! And 2, maybe I am not deep enough to get it, but the poem excerpt on the plate didn't do much for me. So I went to Michaels and picked up a porcelain pen. (Michaels is the only craft store I have found them in so far.) I picked out a quote from Ralph Waldo Emerson, cut a curly cue from a piece of paper for a template and wrote it on. You are supposed to let it dry for 24 hrs then bake the plate to set the pen. After that it says it is even dishwasher safe, although, I am not really worried about that as this is more for display than eating purposes.


Here is how it turned out.


My plate isn't as simple as the Anthropologie one. I got this one at Nell Hills as a pair to hang in my dining room but one of them broke. So the only cost of this project was $3.99 for the pen. But if you don't have a plate on hand I have seen simple white plates at Target that are very inexpensive. 

Here it is propped up in my Dining room. Its final place will be in the kitchen but this worked for getting pictures taken!

This could be really cute for Valentines day with love quotes or something. Go grab a Porcelain pen and get creative!


Linking up to:
HookingupwithHoH


Wednesday, January 25, 2012

Boys' dinosaur room

So... as promised I got a burst of energy and cleaned up the boys shared room (I even washed the sheets... what?!?!) to take some pictures to share. As I posted yesterday we recently moved both the boys into a shared bedroom space in favor of having a playroom for them. It isn't anything fancy, but they seem to enjoy it. The best part is that I only bought two items to change this room up!

Here is the view as you come into the room. The bunk beds belonged to my husband when he was young. My boys think it is awesome that they get to build "forts" on the same bed as their daddy!


When we bought the house my older son was OBSESSED with dinosaurs so I knew I wanted to use them for his room.

I found the super cute quilt on the bottom bunk at Company Kids. Of course when I was ready to move the kiddos in together they had stopped carrying that particular quilt. I ended up just buying dino sheets from target (one of the two purchases) and using the plain red bed spread that came out of the other bedroom. I think I actually like the mix and match look better. I put the dino pillowcase on the bottom bunk and the pillow that matches the quilt on the top bunk to pull them together. 


One of the boys' favorite things is this giant t-rex decal.  I found it on Etsy. I  wish I could remember which shop but I don't. I know it is a little cheesy and over the top, but I am ok with that for my kids' rooms. And when they outgrow it all I have to do is pull it down!


This little nook was perfect for a garage sale desk I found when my oldest was a baby. I spray painted it Navy. 


This was my other purchase. The little cubby things from Target with mini baskets. Ignore the fact that it is completely not centered. I had a serious case of "Iwantthisdonerightnowitis"!! 


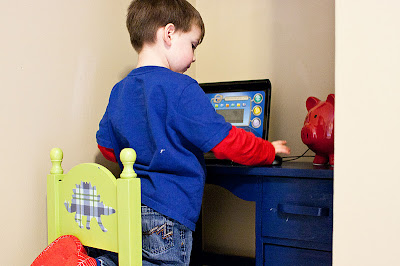
The chair was a clearance find at HomeGoods. It was painted with some car them. I spray painted it green and Mod Podged Dinosaurs cut out of scrapbooking paper onto the front and back! I do love me some Mod Podge.


Here is little man working away on his "laptop".


The drapes were some that we had used in our previous house. I added three colors of grosgrain ribbon and embroidery thread. 


I've had these lamps forever. I found them at Target years ago on clearance for like $10 per lamp with the shades. I spray painted the shade and added a fun display dinosaur inside. 


This sign was made by my mom and sister when my oldest was about a year. It is just a painted canvas with a wall decal on it. They splattered brown paint all over to look like mud and made "dirty handprints" with the same paint.


This is my favorite part of the room. My mom found this after we had already started the Dino theme. I painted this in second grade for the art and science fair. It is a finger painting and the legs are the sides of my hands. I love having this little piece of my childhood in my boys' room!

Well, I hope you enjoyed my boys' spaces! They won't win any design contests but my boys love them and that is enough for me!


Linking up to:
HookingupwithHoH

Tuesday, January 24, 2012

Super Hero playroom

Holy Playroom Batman!!! I know its a stretch! But how can you write a super hero post without using a Holy Something Batman exclamatory??

Anyway, I finally got motivated enough to clean this room up and get some shots of it this morning. When we moved into this house almost two years ago we assumed that since we had the space it would be best to set up a bedroom for each of our boys. We had come from a two bedroom town house and thought they would enjoy having their "own" space. Um... not so much. Since we've lived here I am sure I could count on one hand the number of times they've slept in separate rooms.They actually love sleeping in the same bed! So a few months ago I started really wondering why we were using a whole room for a bedroom when no one wanted to sleep there. 

I have wanted to do a superhero themed playroom for the boys for a while. I had originally planned on doing it in our unfinished basement. Then it dawned on me! Duh! (I'm kinda slow like that) We could rearrange the boys furniture so they could share a bedroom and move most of the toys to the other room for a playroom. They were on board immediately! 

This is the best before picture I could find. The boys' beds are actually my husband's bunk beds from when he was little. Now that they are older we thought they were ready for us to bunk them. So we did and moved them to the other room. (If I get enough energy later this week maybe I'll blog that room.) 


I switched around the furniture quite a bit and moved their train table up from the basement. They got this super cool Batman Geo Trax train set for Christmas this year. I decided to paint the table to look more like a bat cave. Black with yellow cubbies. 


I was able to reuse a lot of the decor I made for the Super Hero Party back in August for this room, which made me SO happy. It was a lot of work and I'm glad it wasn't just for one day!


Those reused items include the comic book bunting and the cardboard box city scape. Just cardboard boxes black wrapping paper and card stock! We just happened to have the perfect little ledge in this room for displaying them. And since they are not super sturdy it is an added bonus that they are well out of the boys' reach!


I was also able to hang the framed comic book pictures from the party. The clock was a clearance purchase from Target. It was under $3.00. The other picture is actually made from that little fire truck canvas you can see next to the bed in the before picture. I painted it a dark grey and Mod Podged a map cut from a book. Then my mom had some scrapbooking letters and we used them to write "Time to save the world". 


These frames were in the boys' rooms before as well. I just put new pictures in a couple of them. I painted the large one with chalk board paint so I could write fun hero quotes on it!


I got the idea for these bins from Sugar Tot Designs. I didn't' realize until they were done that my Super Man logo is in the wrong color. Maybe I'll fix it..... someday! 


The lamp was in here before but it needed a new lampshade. I bought a cheap drum shade from Target and went to town with a  sharpie. Clearly I am a natural born artist! ;)


I found these cute prints on Etsy from TheRekindledPage. I had a hard time choosing just two. She had so many fun pictures!


I have seen both of these signs floating around Pinterest and decided to make my own version. The brother sign is canvas and my mom and I used her cricut to cut the letters out of old comic books and Mod Podged them on.


Simple command hooks hung at kiddo level keep their capes available at all times!


And just because it is fun here are a couple of pictures of the batman train set. Not gonna lie... this one makes it easy to get down on the floor and play with the boys!

Have a Super week! 

Ok, Ok I am done with the cheesy jokes now. Probably!


Linking up to:
HookingupwithHoH

Friday, January 20, 2012

Sneak peek!

Ok, so I have good news, then bad news and then more good news! The good news is that I am ALMOST DONE with the kitchen! The bad news is that I don't think I am going to make it under my $200 budget. The other good news is that if you only have $200 I can tell you how to tweak some of the choices I made to do it with that budget!

Here is a sneak peak of what is going on! 


That's all you get for now! If I still have an arm when I am done with all this painting you'll see the afters very soon!! 

Saturday, January 14, 2012

DIY baby bedding.

Just a quick post to share the baby bedding I just finished for a good friend of mine that just had a baby. She has very classic simple style. She mentioned that she wanted something along the lines of this bedding shown below. This gorgeous linen bedding set is from Layla Grace. Isn't it lovely? The price tag, however is not so lovely. $205 just for the bumper!! What????


Anyway, I volunteered to try my hand at making the bedding for her with my favorite go to fabric.... no, not burlap.... the other one. It is called Osnaburg. It is also found in the utility fabric section and is only about 3.99/yd at any fabric store. It has a lovely natural linen look to it.

I gave her the  bumper a few weeks ago and she sent me some of the pictures she took of it.


I used a ruffler foot to do the ruffles on each side. And I included nice wide ties. 

Today I finished the comforter to go with it. It is also done with the osnaburg and has ruffles all around. For a little personalization I freezer paper stenciled baby girl's name on it as well. 
The font is Jane Austen from dafont.com. I love it!


 And since I had leftover ruffles I didn't want to waste, (It just seemed wrong to throw them away) I made a matching pillow and stenciled Aniston's birthdate on it.


I hope you and Aniston like it Julie! I can't wait to see the finished Nursery!


Update: Julie took this great picture of the comforter in the room.


A side note: My sewing machine died right at the end of making the comforter. Like, the needle will NOT move. So this pillow is all made with stitch witch and liqui-stitch. Isn't that ruffled flower precious?? I love it!


Linking up to:
HookingupwithHoH