Thursday, March 24, 2011

A simple little touch of Spring


I told you all I'd post a little of what I'd been up to. Last year, I bought a lovely ivy topiary to place in my kitchen behind my sink. My black thumb killed it. Yes, I managed to kill ivy! So I needed some green in my house to celebrate spring, but it clearly had to be lower maintenance than ivy..... which can only mean......not living! I stopped by Wal-Mart and got a Styrofoam ball and a bag of the green floral moss. Pulled out my BFF, the glue gun and got to stickin! When that part was done, I literally went into my yard, grabbed a branch off my tree and stuck it in the moss ball. Then I just needed to put some floral foam in my pretty pot and add a little more moss to cover that. It makes me smile while I do the dishes......or at least it makes doing dishes slightly more bearable! ;)

Tuesday, March 22, 2011

risky business


I've been absent a while I know. I wish I had a good excuse, but the truth is, I just haven't felt much like blogging lately. I have been working on some little projects. I will try to post about them this week. Today I am joining in with other bloggers to talk about taking risks with your home. The Nester is having a great party to encourage people to take chances.

I think deep down we all know that living life to its fullest is really about taking chances. When you really think about it "taking chances" with paint or nail holes is not that big of a deal. But it can still be difficult at times. In my case, the initial chance is usually not nearly as difficult as worrying after the fact if I made the right choice. (Not just talking about home decor here). I can be a very impulsive person and tend to just dive right in at times. I alternate between loving this about myself and hating it. I would love it all the time if I didn't have to deal with the constant second guessing that comes after the fact!

Anyway, my "risk" was in painting the shelves surrounding my fire place. When we moved in, they were the same white as the rest of the trim in our house. (shown above) I wanted something that felt cozier and more lived in. For some reason that white seemed so stark and cold to me. My husband loves cozy spaces so he was all on board with my for this one. So I went and bought the paint, and went for it.


Yeah, I am going to need to all to stop lusting after those AWESOME  cables that have yet to be hidden! One risk at a time people! I went with black for a cozy, but still classic feel. I ended up distressing and adding a brown glaze to them as well.

The result? I LOVED it at first. But remember that post where I talked about lightening things up a little? Well there is that nagging second guessing part of me that kind of wants to go back to white. But I am going to live with it a while longer and add some color and brightness in some other places. All the while knowing, I went with my gut and tried something different and I am just a quart of primer and a quart of white paint away from going back if I choose.

What do you think? Worth the risk? What risks have you taken lately?

Saturday, March 5, 2011

Cuz boys cook too!

I've been eyeing these marvelous little kitchens made from end tables and entertainment centers around blog land and I love them. You can go here to see a couple of examples. Anyway, I have been keeping an eye on craigslist to try to find a cheap entertainment unit or end table to work with. But, I didn't know for sure how often it would get used and I have other projects I need to tackle before taking on a project that big. So I decided to do a mini version trying use mostly what I already had laying around my house.

Enter, my microwave cart. I had this in my pantry in our old house. Yes the pantry in my old house was big enough to put this table into it and still walk around. And yes, I still miss that pantry. Every. Single. Day! But that is not the point. Anyway, since I DON'T have that pantry anymore, this has just been sitting in my basement. It had a natural wood top, but I had already painted it black by the time I remembered to take the before picture. I also have a large toaster oven that was given as a gift a few years back. When Thanksgiving came around I was so excited to have an extra oven, but when we went to use it it no longer worked. Maybe it was in storage too long! Anyway, I thought it would be a great addition to the boys' little kitchen.


I painted four silver circles on the top in two different sizes and then painted some craft sticks black and cut them down to size.


My fingers looked like this after that step


I just used my hot glue gun to attach the craft sticks. Then I added a little red fabric around the bottom to cover the sides and back of the little oven.

I still have to permanently attach the knobs. I just set them on the top to take the pictures. (They were $5.00 on clearance for a pack of ten at Target! Score!!)

I also want hubs to make a little shelf to go above the oven. But other than that here is the finished product.


The little drawer with the utensils even pulls out!

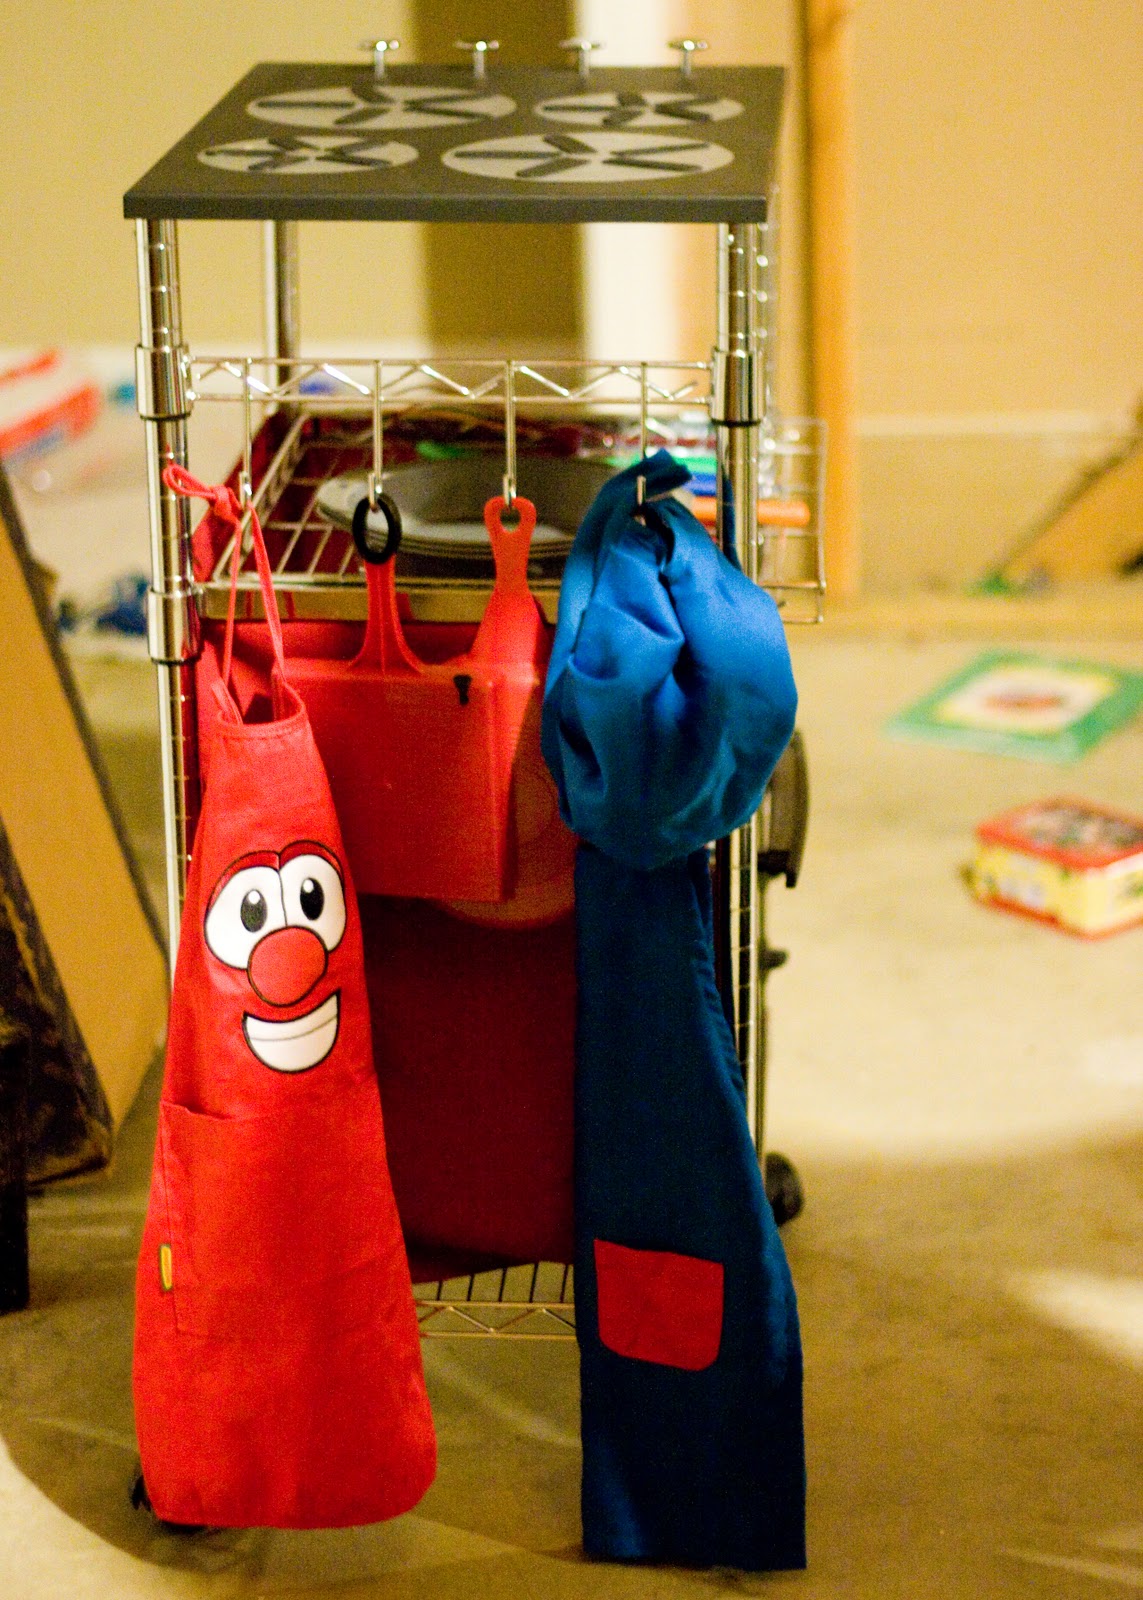
Little hooks to hang their play skillets and aprons

They will need a stool to reach it better, but all in all, not bad for using up things I already had.

Total Breakdown:

Microwave cart - Free
Oven - Free
Craft paint - Free
Craft sticks - $1.00
Knobs - $5.00
Fabric - $3.00

Total - $9.00

I'll take it!

Tuesday, March 1, 2011

Looking back

I found some old pictures yesterday of our last house. It was our first real DIY experience. We had done a few things to our first house.... some painting and tile. But this old 1920's brick house was in a whole different ball park. We were only there for two years because my husband got transferred. While I am so glad we are where we are now, I do wish we had been able to see that project to its completion. I thought I would share some before and after pictures of that house, because it is a big part of my "DIY identity" if that is even a real thing! :) Please don't judge too harshly! This was before I knew anything about the DIY blogging world or even photography! Just a fun little piece of my past. I hope you enjoy!


Living room before

Living room after paint & our furniture

Another view of living room with some pictures and accessories
Den/Office before

Den/Office after

Master Bedroom before.....Not kidding!

Master after paint, carpet removal and refinished hardwoods


Nursery before

Nursery after

 Now, onto the major renovations!! This kitchen was a huge undertaking for us! We could not afford new cabinetry or to have anyone come do it for us. We had to do a lot of work with what we had and improvise quite a bit. But we were really proud of the final result!

Before

Before Alternate view
 
After

After
Quick rundown: We painted the existing cabinets and bumped out the cabinet in front of the sink a little and added the detail of the twisted posts. We got granite counter tops (We got the same effect for less money because we got the thinner cut.) The island and the knobs were splurges for us. The island was from Crate and Barrel and the green glass knobs from Restoration Hardware. The large white tile on the walls was original to the house and is an all glass tile called Vitrolite. It clearly dictated the color scheme in our kitchen. I fought it for a while, but ended up falling in love with it. I loved that kitchen! It made me feel happy! It is the reason I can't shake the urge to paint our oak cabinets in our current house.

Our other large undertaking was the main bathroom.

Before

After. That beautiful original tile was being covered by that awful grayish blue!!
I know what you are thinking! All that work and you left that hideous fan in there??? I know I know! I hated it too. But there was no ventilation in that bathroom and when you got out of a hot shower it was pretty miserable. It was one of the many things on the list we didn't get a chance to get to.

We removed all of the existing tile and put up White subway tile. That job was NO JOKE!!

We also added new light fixture, medicine cabinet and of course the bead board!!

We actually had a number of other makeovers we did to this house but we didn't think to take good before and after pictures! We did a complete overhaul of the second floor of this house as well. But we did it just to sell the house and I have no photos! I will probably regret that for a long time! Oh well.