Tuesday, January 24, 2012

Super Hero playroom

Holy Playroom Batman!!! I know its a stretch! But how can you write a super hero post without using a Holy Something Batman exclamatory??

Anyway, I finally got motivated enough to clean this room up and get some shots of it this morning. When we moved into this house almost two years ago we assumed that since we had the space it would be best to set up a bedroom for each of our boys. We had come from a two bedroom town house and thought they would enjoy having their "own" space. Um... not so much. Since we've lived here I am sure I could count on one hand the number of times they've slept in separate rooms.They actually love sleeping in the same bed! So a few months ago I started really wondering why we were using a whole room for a bedroom when no one wanted to sleep there. 

I have wanted to do a superhero themed playroom for the boys for a while. I had originally planned on doing it in our unfinished basement. Then it dawned on me! Duh! (I'm kinda slow like that) We could rearrange the boys furniture so they could share a bedroom and move most of the toys to the other room for a playroom. They were on board immediately! 

This is the best before picture I could find. The boys' beds are actually my husband's bunk beds from when he was little. Now that they are older we thought they were ready for us to bunk them. So we did and moved them to the other room. (If I get enough energy later this week maybe I'll blog that room.) 


I switched around the furniture quite a bit and moved their train table up from the basement. They got this super cool Batman Geo Trax train set for Christmas this year. I decided to paint the table to look more like a bat cave. Black with yellow cubbies. 


I was able to reuse a lot of the decor I made for the Super Hero Party back in August for this room, which made me SO happy. It was a lot of work and I'm glad it wasn't just for one day!


Those reused items include the comic book bunting and the cardboard box city scape. Just cardboard boxes black wrapping paper and card stock! We just happened to have the perfect little ledge in this room for displaying them. And since they are not super sturdy it is an added bonus that they are well out of the boys' reach!


I was also able to hang the framed comic book pictures from the party. The clock was a clearance purchase from Target. It was under $3.00. The other picture is actually made from that little fire truck canvas you can see next to the bed in the before picture. I painted it a dark grey and Mod Podged a map cut from a book. Then my mom had some scrapbooking letters and we used them to write "Time to save the world". 


These frames were in the boys' rooms before as well. I just put new pictures in a couple of them. I painted the large one with chalk board paint so I could write fun hero quotes on it!


I got the idea for these bins from Sugar Tot Designs. I didn't' realize until they were done that my Super Man logo is in the wrong color. Maybe I'll fix it..... someday! 


The lamp was in here before but it needed a new lampshade. I bought a cheap drum shade from Target and went to town with a  sharpie. Clearly I am a natural born artist! ;)


I found these cute prints on Etsy from TheRekindledPage. I had a hard time choosing just two. She had so many fun pictures!


I have seen both of these signs floating around Pinterest and decided to make my own version. The brother sign is canvas and my mom and I used her cricut to cut the letters out of old comic books and Mod Podged them on.


Simple command hooks hung at kiddo level keep their capes available at all times!


And just because it is fun here are a couple of pictures of the batman train set. Not gonna lie... this one makes it easy to get down on the floor and play with the boys!

Have a Super week! 

Ok, Ok I am done with the cheesy jokes now. Probably!


Linking up to:
HookingupwithHoH

Friday, January 20, 2012

Sneak peek!

Ok, so I have good news, then bad news and then more good news! The good news is that I am ALMOST DONE with the kitchen! The bad news is that I don't think I am going to make it under my $200 budget. The other good news is that if you only have $200 I can tell you how to tweak some of the choices I made to do it with that budget!

Here is a sneak peak of what is going on! 


That's all you get for now! If I still have an arm when I am done with all this painting you'll see the afters very soon!! 

Saturday, January 14, 2012

DIY baby bedding.

Just a quick post to share the baby bedding I just finished for a good friend of mine that just had a baby. She has very classic simple style. She mentioned that she wanted something along the lines of this bedding shown below. This gorgeous linen bedding set is from Layla Grace. Isn't it lovely? The price tag, however is not so lovely. $205 just for the bumper!! What????


Anyway, I volunteered to try my hand at making the bedding for her with my favorite go to fabric.... no, not burlap.... the other one. It is called Osnaburg. It is also found in the utility fabric section and is only about 3.99/yd at any fabric store. It has a lovely natural linen look to it.

I gave her the  bumper a few weeks ago and she sent me some of the pictures she took of it.


I used a ruffler foot to do the ruffles on each side. And I included nice wide ties. 

Today I finished the comforter to go with it. It is also done with the osnaburg and has ruffles all around. For a little personalization I freezer paper stenciled baby girl's name on it as well. 
The font is Jane Austen from dafont.com. I love it!


 And since I had leftover ruffles I didn't want to waste, (It just seemed wrong to throw them away) I made a matching pillow and stenciled Aniston's birthdate on it.


I hope you and Aniston like it Julie! I can't wait to see the finished Nursery!


Update: Julie took this great picture of the comforter in the room.


A side note: My sewing machine died right at the end of making the comforter. Like, the needle will NOT move. So this pillow is all made with stitch witch and liqui-stitch. Isn't that ruffled flower precious?? I love it!


Linking up to:
HookingupwithHoH

Thursday, January 12, 2012

Dining room makeover

Since I know you have all been just sitting on the edge of your seats to see my dining room makeover... here it is! :) First, lets do a quick before.

In the nook is the Beast's sister in all her black glory! See the room wasn't  bad... but a little heavy. First... those old lady curtains had to go. Those came with the house. Then I painted everything below the chair rail a nice bright white and above a soft bluish grey. I painted the hutch and sideboard and added a few other fun little details.


The lovely floral pictures were found at Home Goods for less than $15 a piece.... framed! I love that place. The runner is made from leftover fabric from the window treatment. To give it a little more interest I taped off a couple of stripes and painted some blue/grey acrylic paint with textile medium added to it. 


This mirror and the plates came from one of my absolute favorite stores, Nell Hill's. They have BEAUTIFUL decor in there. The furniture is really expensive but the accessories are surprisingly affordable! It is a little hard to tell in the picture, but the plates actually look like tree stumps. Crisp AND a little rustic! Be still my heart!


Here is a better shot of the hutch. I like her soooo much better in the grey. 


A chair that used to be in my office until I realized it wasn't nearly tush friendly enough for the amount of time I spend editing pics!


 I had bought two more white plates to hang here as well, but in my severe impatience to get them hung I cut corners and they fell and one broke. Whoops! So I found this old Pampered Chef woven platter and hung it. Then added a coffee filter wreath to lighten it up some. Cost.... nothing! Love that!


And finally... replacement window treatments. I did the faux roman shade treatment using the old mini blinds using this tutorial. It was so simple! And again I used fabric I had bought a long time ago for another project. So the only cost was liquid stitch, ribbon and the pom pom trim I placed across the bottom.


Here you can see that it functions perfectly as well. I rarely close it, but it is nice to have the option!


Over all this room makeover was very inexpensive! Mostly just the cost of paint. And I am very pleased with the result!  Let's take one more look at the before and after shall we??


Before
After


Linking up to

Tuesday, January 10, 2012

Sideboard makeover

We have been a little busy around here! Something about the motivation of a new year always makes me want to start checking things off my diy list. The piece in this post has actually been done for quite a while, but I just got motivated to get all the furniture in the dining room rearranged for it to fit right in the space. Tomorrow I will show you the whole dining room which has been in process for (cough, cough) a while! Anyway!!! It is done now. And that is what matters. 

This sideboard was my Grandmothers and her sister (my hutch) has been in my dining room since we moved into this house. I had originally painted the hutch black. I loved it, but it ended up feeling a little heavy. And especially when I got her sister... I refer to her as the Beast... I knew the black would consume the room.

P.S. Yes, I do usually humanize my furniture. Some of my close friends and family have already suggested I seek help for this, ahem, quirk of mine.

So I went with a nice soft grey color instead. Who after looking around on Pinterest for any length of time could avoid the soft grey craze??? 

Here are a few pictures before. See why I call her the beast?? She is HUGE! But ALL of that storage makes me feel a little giddy! (ignore our disaster area of a garage)


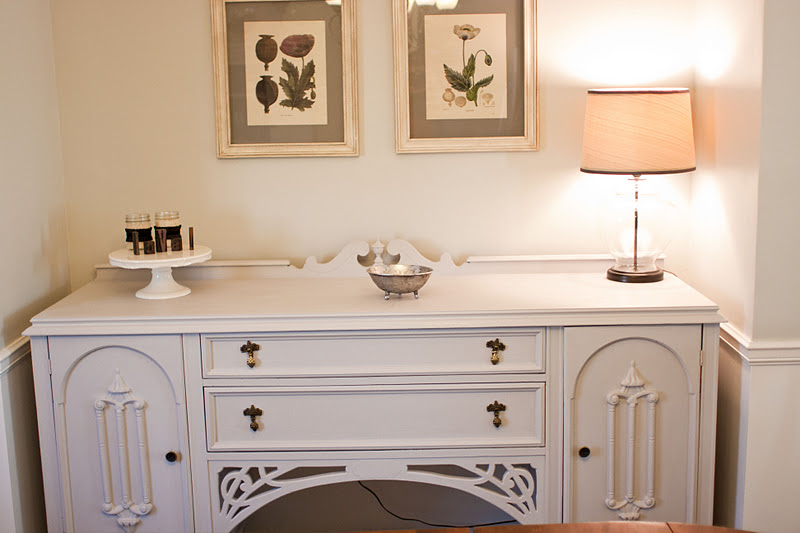
And here she is now! I think the color is called Everyday Grey by Sherwin Williams. Their ProClassic line is usually my go to paint for furniture. Especially if it is a piece that will get a lot of use. It holds up beautifully in my experience. 


And here she is situated perfectly in the little nook in my dining room. It is as if it was made just for her!


Not only is it great storage, I can't wait to have a dinner party! Isn't that just the perfect place for all those dishes that crowd the table when you have a large group? 


Anyway... this is just the beginning of the projects that are getting checked off around here. We have been working on moving the boys into a shared room so we can turn the other into a play room for them. So fun! Stay tuned!

Linking up to:

Miss Mustard Seed
The Shabby Creek Cottage

Monday, December 12, 2011

Handmade Christmas gifts

Seriously... is Christmas less than two weeks away already??? How did that happen? This time of year is so crazy for us anyway as we have a lot of family birthdays crammed into the Holiday madness as well. My poor oldest is that kid who gets ripped off in the party category because his birthday falls smack in the middle of December! I fully intended to do a party this year... then I blinked and his birthday is in two days. The best I will be able to rustle up is Angry Bird cake pops for his pre-school class. Boo!

But  I have been busy at work with hand made Christmas gifts for almost everyone on my list! I am hoping to share at least a couple of them this week! The first is part of the gift for my son's preschool teacher. Since I am new to the whole "school" thing I don't know what people normally do for teachers. But we just love both of his teachers this year. They are so sweet and have made his transition from home all the time to part time school so enjoyable for him! I wanted to do something different than just a treat basket. (My usual stand-by gift). It started with a pin... of course.


Source: stamp48.com via Lori on Pinterest

I wanted to try something similar to this. To be perfectly honest; I got a little too ambitious and it didn't turn out exactly like I had in mind. Once again, I leapt into a project without thinking through all of the details. I think it cam out ok though.

I started with some inexpensive knit fabric from JoAnne. I got four yards and was thinking I could do the teacher gifts plus some for friends as well. And here is where I messed up. Instead of reading the instructions closely to realize I should have used two yards for the length. I figured the width of the fabric (58") would be fine. It is ok, but if you do one I recommend using the 2 yd length instead. I ended up using exactly 1/2 yard of fabric per scarf.

I found a quote about teaching I liked and used a Tee Juice marker (also found at JoAnne) to do the writing. I wrote it out in cursive and then sewed a little pom pom trim onto the ends of the scarf.

Here is the finished product.

Our newest family member trying to check it out. Please also ignore my insanely dirty floors!

I tried it on, but only got an iPhone picture of that. You can see that it is too short to loop all the way around, but I think it still works. 


Let me know what you think. What kind of DIY gifts are you all working on?? Seriously... I need some more ideas! :)